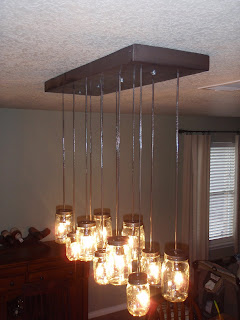
We just finished our mason jar chandelier!
Isn't it fun what you can do with mason jars?! I fell in love with Pottery Barn's exeter 16-jar pendant. I HAD to have it in our home, but not for $399.00! So, I spent several months perusing blogs written by people that had created their own, but was never able to find a detailed tutorial or a chandelier quite like the one I wanted. After a zillion trips to Lowe's and The Home Depot with Greg, we were able to create a design and plan for our perfect chandelier. After a few test runs, we succeeded! So, for all of you out there that have been wanting to recreate PB's mason jar chandelier, but don't quite know how to do it, here is a step-by-step how-to! Enjoy!
Things You Will Need:
(12) mason jars (I used 6 quart size & 6 pint size)
50' of 18-2 lamp wire
(12) keyless sockets
(12) light bulbs of your choice (I suggest using a low wattage bulb)
24"x48" sheet of metal
(4) 4" lag screws with washers
(4) self tapping steel screws
(2) wire nuts
Cordless drill & drill bit
Electrical tape
(1) can of rustoleum
**Be prepared to dedicate about an entire day to this project**


Plan your design: Decide the size of ceiling plate you want, the spacing between each cord, and how long you want each cord to be. Your desired cord length will determine how much lamp wire you need to buy. Our cords ranged between 2'4"-2'8".
Score the sides of sheet metal so that you can bend them to form sides. You can use self tapping steel screws to hold the sides together.


Drill holes for your cords (12) and holes to mount the plate to the ceiling (4).
Spray paint your ceiling plate.


Cut your lamp wire to your desired lengths.
Spray paint the cords.

Drill holes in the lids of the jars. We drilled two smaller holes in each lid to prevent over heating of the jars.
Spray paint the lids.

**If you are unsure when it comes to the electrical wiring, ask the electrical/lighting department at your local home improvement store. They can help you!**
Attach one end of the lamp wire to the keyless socket. Screw in light bulb. Slide jar lid on top. (Do this for
each cord)


String cords through the holes in your ceiling plates. Tie knots in each cord to hold them into place. Strip the end of the lamp wire cord.


Attach wires to wire nut and then to ceiling box.

Finally, just screw the ceiling plate to the ceiling and attach your mason jars to their lids :)
Enjoy! Feel free to email me if you have any questions!
This is Pottery Barn's version for $399.00

And this is ours for less than $100.00


I love it! Great tutorial and beautiful result! We haven't attempted a DIY light yet but we do have a plan for something along the same lines...someday. Thanks so much for sharing your tips and tutorial and awesome light in the DIY Project Parade! :)
ReplyDeleteRoeshel
What a beauty!.. love it!..
ReplyDeleteThis is a beauty. Thanks for the detailed tute. It really came out super.
ReplyDeleteI just need to do this! It's so cool looking. Great job.
ReplyDeleteGrace, this project turned out great. Congrats on such a beautiful chandelier. Thanks for using Rust-Oleum!
ReplyDelete- Rust-Oleum Scott
That is great! I saw it on Knock-off Decor.
ReplyDeleteAbsolutely stunning!!! Great job!!! Wish I had a room to put one in!!!! Im jealous! =)
ReplyDeleteWow! What an amazing job! I love, love, love it!
ReplyDeleteMy Mama and I are huge collectors of the vintage Mason jars. We always find them at the oddest places (Once finding a whole box of them at a shop on Olivera Street in Los Angeles - the lady wanted to dump them so she sold them to us for 50 cents a piece!), and both have quite a collection. I think a few blue jars intermingled with the clear jars will be simply breathtaking. Thank you so much for this tutorial! I will definitely be using it in my new home!!
ReplyDeletexoxo,
Regan
Grace, Can you share with me what size the sheet metal you used was? You did such an awesome job!!
ReplyDeleteWe just used this tutorial (with a few tweaks) to make one for our new house and are loving the chandelier. We put a piece of plywood into the bottom of the metal ceiling plate (we bought a pretty flimsy, inexpensive one) to give some extra stability and keep it from bowing out under the weight of the mason jars. Thanks!
ReplyDeleteMy Daughter wants out friend to make one for a party she is having in Dec. Does this take long? Does this give out a lot of light? It looks like it does..
ReplyDeleteHow did you get the wires to take the spray paint? I sprayed mine with Rustoleum but even after a week the paint just wipes off. Any suggestions? Thanks!
ReplyDeleteSoundslikeAshley, we let the spray paint dry for an entire day and it was still a little sticky while we were hanging the final product. It wasn't wiping off, though. Maybe try using a blow dryer? I hope you're able to get it to work!
ReplyDeleteHello! Thank you for your great tutorial. I am in the process of making a similar light fixture. I had a question about your keyless sockets. How did you get the pins to pierce your wire?
ReplyDeleteWow! That looks awesome! I was just looking at the Pottery Barn version last night. I might try this out. Thanks for the instructions!
ReplyDeleteThis is amazing work! I was about to buy the one at PB and then came across this! I'm going to try it out. I actually don't understand how you mount the metal plate to the ceiling. Any advice would be great!
ReplyDeleteEric, we used 4 lag bolts and simply drilled them through the metal sheet and into the studs in the ceiling. Let me know if you have any more questions. Good luck!
ReplyDeleteYou make it look so easy! Was the wiring part hard (where you attach the cut wires to the ceiling)? I think I'm gonna try this.
ReplyDeleteI'm assuming you turn off the power before starting- I wouldn't want to fly across the room!
TheGlassKnob, wiring wasn't too hard, but you're going to want to make sure you have several hands! :)Yes, definitely turn off power before. Thank you for pointing that out, I should definitely include that in the tutorial!
ReplyDeleteWhat do you use to score the metal? How did you attach the fixture to the ceiling?
ReplyDeleteLove it! What wattage did you use? I feel like it doesn't look bright enough? Is it really?
ReplyDeleteI always love DIY crafts especially lighting fixtures! I love building the body, but the electrical part is not my forte. No matter how simple the directions are, I'm not confident that I can manage to install them properly. That's why I'm always asking for my brother's help. I'm looking forward to attend a seminar about basic electrical wiring soon though.
ReplyDelete-Margert Woodcock
I LOVE the way it turned out! I can't wait until we own a house again so we can do more stuff like this. If you wouldn't mind, I'm working on a post of DIY Mason jar light fixtures and I'd love to feature yours. Would it be okay if I used one of your pictures? I'd of course link back to your post :)
ReplyDeleteAnd now that it's been about a year and a half, are you still loving it? Are the lids doing ok? I saw PB says galvanized steel lids, did the regular ones you get with the jars hold up ok?
ReplyDeleteWhere did you get the Exeter mason jars? I believe I bought this light from you in December and 3 jars were broken when I opened the box
ReplyDeleteI don't sell these, so I think you may be thinking of someone else. I bought these particular jars from World Market several years ago, but you can find them at Target, Michael's, Hobby Lobby, Walmart, Home Depot, etc. It just depends on what type of look you want from the jars. I think mismatched jars would be fun if you could find enough from an antique shop! Thanks for finding the tutorial :) I had forgotten I put this out there. We have since moved and had to leave the light to the new owner, I miss it so much! ;)
DeleteGrace, I'm a late comer to the mason jar lighting craze but I wanted to say how great your light fixture turned out. The very first comment on this page asks about more detail on connecting all the cord wires to be able to connect them to the one or two wires that come from the ceiling. I too need more information on that. Is there a way you could enlighten us? Or is there a good tutorial or video you know of on the subject? I'm planning to start this project this coming week. I welcome all the clarity I can get. PLEASE help if you have a minute to spare. Thanks for the tutorial.
ReplyDeleteHello Dear,
ReplyDeleteThe blog was absolutely fantastic! Lot of great information which can be helpful in some or the other way. Keep updating the blog, looking forward for more contents.
Jar lights - Get the best deal on colorful jars, solar jars, solar jar lights, gift jars, jar decorations, decorative jars, hanging solar lights outdoor, mason jar solar lights, solar lanterns & jar lights at amazon.com from great selection at Sogrand Industry Inc Store.
Visit the product page: - https://www.amazon.com/dp/B07D4KWBP4
Sogrand Industry,Inc,15 Years Solar Light Manufacturer Directly Sells on Amazon.
Best Solar Lights Collection Storefront: - https://www.amazon.com/shops/sogrand
Get the best deal on solar christmas decorations outdoor, solar christmas lights outdoor, solar table light, solar table lights outdoor, solar table lamp, solar table lamps outdoor, solar jar lights, solar jars with lights, solar glass jars, solar glass ball table light, solar ball lights outdoor, hanging solar lanterns, mason jar solar lights, jar solar lights outdoor & ball solar lights outdoor on amazon.com from great selection at Sogrand Industry Inc Store.
ReplyDeleteVisit the product page: - https://www.amazon.com/dp/B07D4KWBP4
Sogrand Industry,Inc,15 Years Solar Light Manufacturer Directly Sells on Amazon.
Best Solar Lights Collection Storefront: https://www.amazon.com/shops/sogrand
Solar Christmas Lights Outdoor Decorations Table Light Glass Ball Table Lamp Jar Mason Jars Hanging Solar Lantern 4 Color 8 LED Copper Wire Sogrand Garden Decor for Gift Yard
Features :-
Have great fun and enojy an amazing outdoor hanging solar christmas lights glass jar.and eye-catching pattern.
It is a magic solar jar for kids room, bathrooms,dinner table and party.
Great decoration solar jar lights outdoor on a patio or deck or on a screened porch.
Put on table or hang anywhere you want.This solar galss jar has a rope handle/hanger used to suspend the jar on a hook.
Take off the solar lighting cap and underneath is an on/off button. Flip the setting to on and it works.
4 color 8 LED copper wire inside jar,change the lighting feature by yourself :-
Present beauty of 4 color 8 LED through the jar,get different jar lighting features when you turn or adjust the copper wire inside.
Thick Rope Hanger :-
A thick rope hanger helps you to hang the solar jar where you want,on tree,before window,or inside.
Clean Energy,Energy-saving LED :-
Charged by sun,solar powered. Enrivonment friendly:No wire required,no electricity needed. Auto On/Off:Automatically turn on at dusk and off at dawn
Energy-saving:LED lighting source with high efficiency and lowest power consumption.
Hi guys, I would recommend a great Solar jar lights seller on Amazon, Sogrand offer high quality of Solar jar lights which I bought using now charming lighting atmosphere around house with great fun.
ReplyDeleteHere is the beautiful Solar jar lights I like so much: https://www.amazon.com/s?k=Solar+jar+lights&me=A39PH15OSSYYUG&ref=nb_sb_noss